Table of contents
As you might know, each product requires a particular page layout based on its unique features. So the thing here is to customize a specific product page layout for several products under a category without changing the category layout.
To do that, we’ll need to go through the basics, and only from there, we will learn to customize product page layout with layout files.
About layout files
In Magento, layout files are .XML files which are used to define the structure of a given page. Layout files are classified into:
- Base layouts: the layout files provided by modules
| Type | Location |
|---|---|
| Page configuration & generic layout files | <module_dir>/view/frontend/layout |
| Page layout files | <module_dir>/view/frontend/page_layout |
- Theme layouts: the layout files provided by themes
| Type | Location |
|---|---|
| Page configuration & generic layout files | <theme_dir>/<Namespace>_<Module>/layout |
| Page layout files | <theme_dir>/<Namespace>_<Module>/page_layout |
How to customize product page layout
To customize the layout of a given page, you’ll need to override that page’s layout file with a custom one. To do so, you’ll need to locate the layout files for your theme’s product page.
Customize product page layout for all product types

Magento 2 Previous/Next Product Page
Magento 2 Previous Next Product Page is an optimized feature that allows customers to navigate through product pages with a single click seamlessly. This feature elevates your store’s usability and maintains a smooth and enjoyable browsing experience for your customers.
What if you want to customize the product page layout for all of your product types?
This is the easy part, as you’ll only need to make changes to the common layout file i.e., catalog_product_view.xml (located in /theme_dir/Magento_Catalog/layout/) for the change to be reflected on all of your product types.
Structure content in the layout using containers
The layout of your product pages is structured using containers, which can be referenced or has more blocks added into it.
Example:
<move element="product.info.social" destination="product.info.main" before="product.info.price"/>
Here are the common containers used in product page layout:
product.info.mainproduct.info.priceproduct.info.stock.skuproduct.info.form.contentproduct.info.extrahintproduct.info.socialproduct.info.media
Customize product page layout for a specific product
There are two ways you can go about customizing your product page’s layout for a specific product, both involve putting files in a specified /layout/ folder.
Method 1: Create a custom layout update
Starting with Magento 2.3.4, the Layout Update XML field in Magento Admin Panel is now converted into a selector, which means you can no longer freely add code into this field anymore.

In order to apply custom layout updates for your product pages, you’ll need to put an .XML file in a specified folder (app/design/frontend/<Vendor>/<Theme>/Magento_Catalog/layout/). The layout update from that .XML file will then appear under Custom Layout Update as a selectable option.
The rule for custom layout update file names
Your custom layout update file names will need to adhere to the following rule:
catalog_product_view_selectable_<Product SKU>_<Name for Layout Update>.xml
where:
<Product_SKU>: is the SKU of the product that you want to apply custom layout update<Name for Layout Update>: is the name of this layout which will be shown in the Custom Layout Update selector
For example, if we want to apply a new custom layout update for this SKU: MH05. We’ll need to put a custom layout file named catalog_product_view_selectable_ MH05_test.xml in /theme_dir/Magento_Catalog/layout/, with the content like below:

<?xml version="1.0"?>
<page layout="1column" xmlns:xsi="http://www.w3.org/2001/XMLSchema-instance" xsi:noNamespaceSchemaLocation="urn:magento:framework:View/Layout/etc/page_configuration.xsd">
    <body>
        <move element="page.main.title" destination="product.info.main" before="-"/>
        <move element="product.info.stock.sku" destination="product.info.price" after="product.price.final"/>
        <move element="product.info.review" destination="product.info.main" before="product.info.price"/>
		<referenceContainer name="page.wrapper">
             <referenceBlock name="breadcrumbs" remove="true"/>
         </referenceContainer>
    </body>
</page>
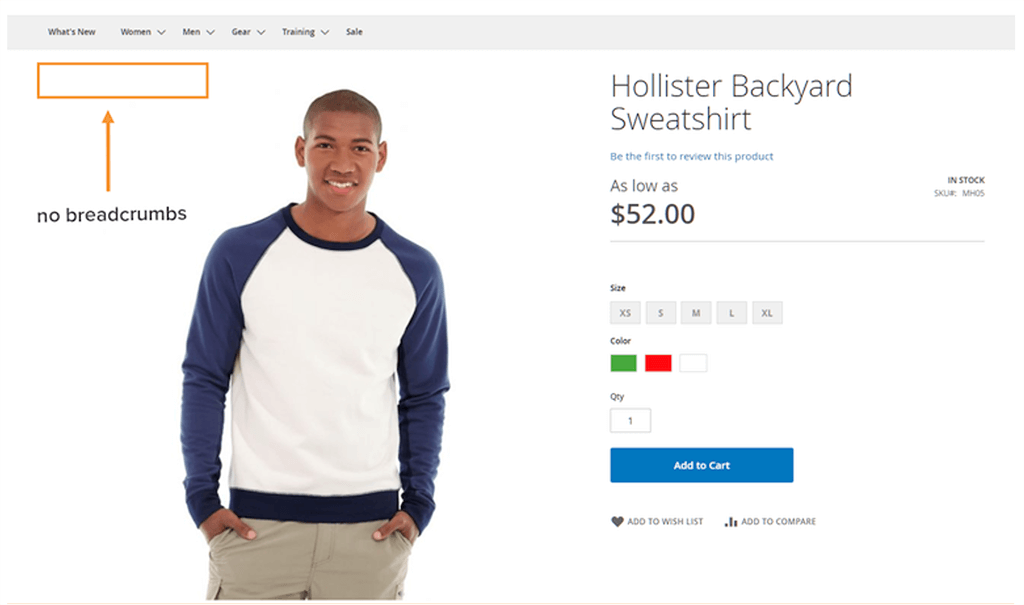
What this test layout will do is it’ll remove the breadcrumbs from Product SKU MH05’s product page.
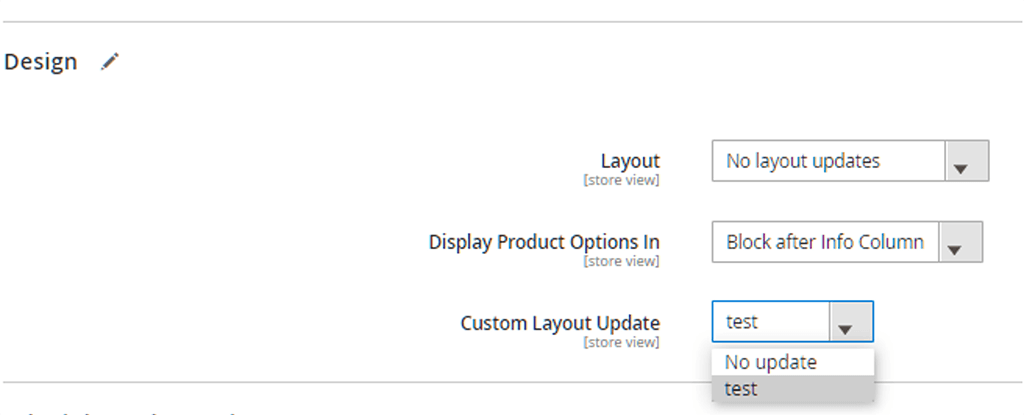
Next, in Catalog > Products, choose the product with SKU MH05. You should now be able to see a custom layout update named test:

Choose this new custom layout update and Save the changes.
Now clear your cache using:
php bin/magento cache:flush
And the changes should now be reflected on your frontend.

Method 2: Overriding layout
With the addPageLayoutHandles method, you can override the layout using:
- Product ID
- Product SKU
- Product TYPE
For example, if you want to customize the product page layout for a product with ID 68, the layout file’s name will need to adhere to the following format:
catalog_product_view_id_number.xml
e.g., catalog_product_view_id_68
And the file will need to be in the following part:
/theme_dir/Magento_Catalog/layout/

Clear the cache following the system’s message. If not, you can go to the frontend to check out the new customized page layout for the specific product.
For product type, you can follow the same steps and change the file’s name accordingly. For example, use catalog_product_view_type_bundle.xml to apply the new page layout for bundled products.
Hope you enjoy your new page layout for your lovely items!
Related posts:
How to Customize the Checkout Process in Magento 2
How to customize your Magento Email Templates


