How to Create a PEM File for iOS Push Notifications

While building a mobile app with SimiCart, many customers encounter difficulties in creating a PEM file for iOS push notifications. So in this post, we will guide you how to create a PEM file.
See more:
- 10 Key Phases of Mobile App Development Process
- 5 best free AI app builders without coding in 2025
- How to Create Mobile App No Coding: A Detailed Guide
What is a .PEM File?
PEM format which stands for Privacy Enhanced Mail is a Base64 encoded DER certificate. PEM certificates are frequently used for web servers as they can easily be translated into readable data using a simple text editor. According to Wikipedia, PEM data is commonly stored in files with a “.pem” suffix, a “.cer” or “.crt” suffix (for certificates), or a “.key” suffix (for public or private keys). The label inside a PEM file represents the type of data more accurately than the file suffix, since many different types of data can be saved in a “.pem” file.
iOS app allows you to push notifications to all of your mobile users. There are three things a push notification can do:
- Display a short text message
- Play a brief sound
- Set a number in a badge on the app’s icon
PEM file is used to setup Apple Push Notification. In this tutorial, you will be guided to generate a PEM file.
What is a PEM certificate?
A PEM certificate is a file format used to store and share cryptographic keys and digital certificates, primarily for securing communications over networks. PEM stands for Privacy Enhanced Mail and it was originally developed to secure email transmissions but has since become a standard for various security applications.
- Format: PEM files are encoded in Base64 and typically contain data encapsulated between two header lines, for example:
-----BEGIN CERTIFICATE-----
[Base64 encoded data]
-----END CERTIFICATE-----
- Usage: PEM certificates are widely used in SSL/TLS configurations to secure web communications. They can hold public keys, private keys, and entire certificate chains (including intermediate and root certificates).
- File Extensions: Common extensions for PEM files include
.pem,.crt,.cer, and.key, depending on the specific content they contain. - Accessibility: Being plain text files, PEM files can be easily opened and edited with standard text editors, which makes them user-friendly for system administrators.
PEM certificates play a crucial role in establishing secure connections over the internet, enabling encrypted communications that protect sensitive data during transmission.
Here’s Detailed Guide to Create a .PEM File
Basically, to get a PEM file, you need to generate 3 following files:
- Certificate Signing Request (CSR file)
- SSL certificate (aps_ distribution.cer)
- Private key as a .p12 file
Okay. Let’s start now!
Step 1: Generate the Certificate Signing Request (CSR)
Whenever you apply for a digital certificate, you need to provide a Certificate Signing Request or CSR for short.
When you create the CSR, a new private key is made that is put into your keychain. You then send the CSR to a certificate authority (in this case that is the iOS Developer Portal), which will generate the SSL certificate for you based on the information in the CSR.
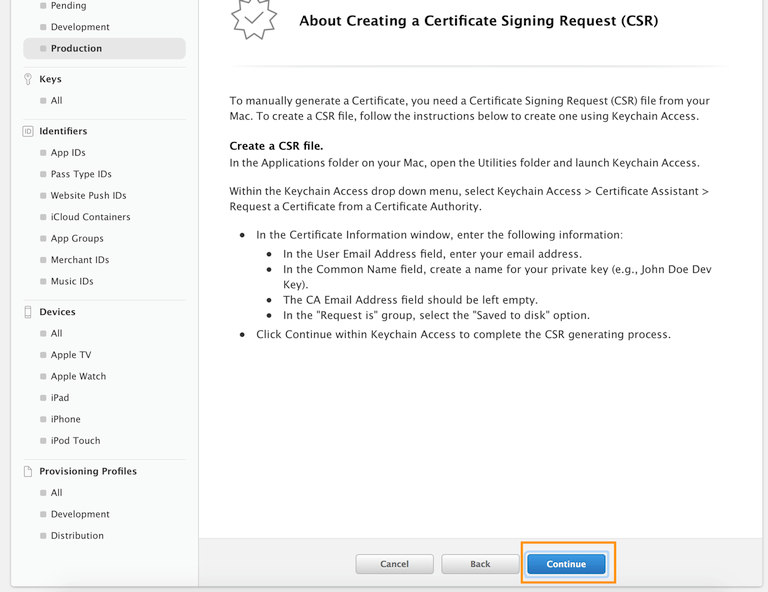
Go to Applications / Utilities / Keychain Access / Certificate Assistant on your Mac and choose the menu option Request a Certificate from a Certificate Authority
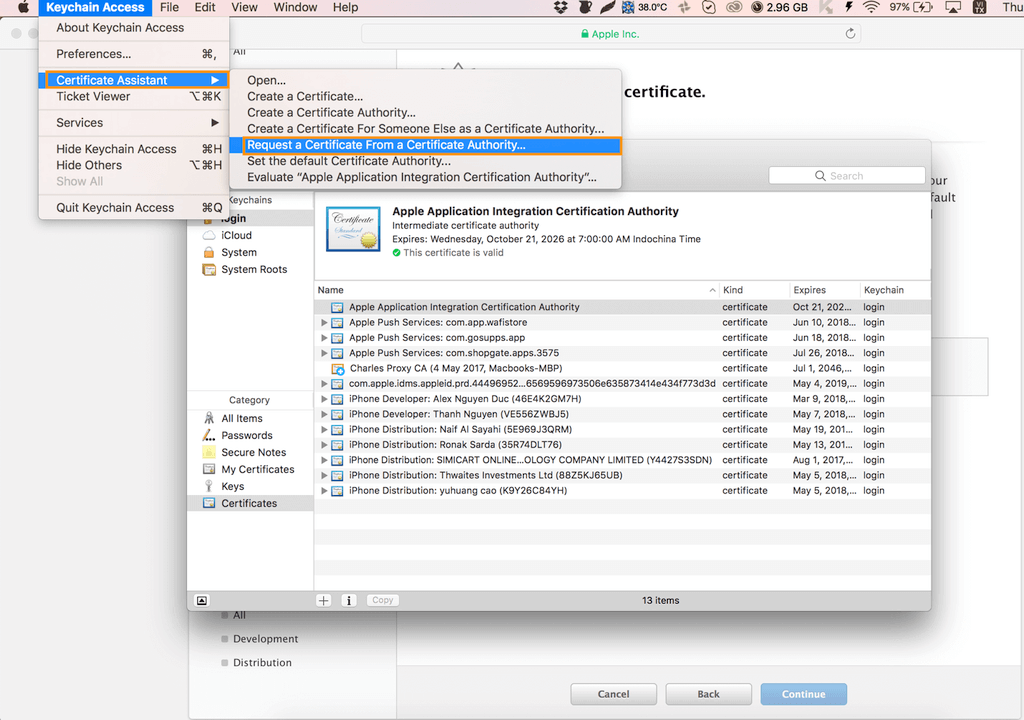
If you do not have this menu option or it says “Request a Certificate from a Certificate Authority with key”, then download and install the WWDR Intermediate Certificate first. Also make sure no private key is selected in the main Keychain Access window.
You should now see the following window:
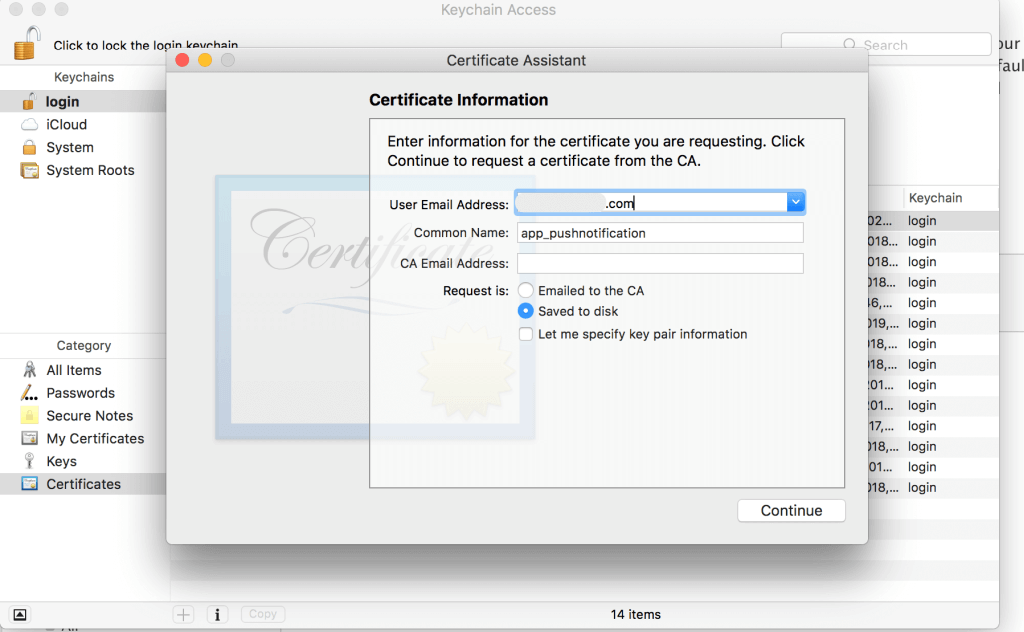
- User email address: enter your email address here. It can be either same email address used to sign up for the iOS Developer Program or any email address.
- Common Name: enter anything you want but it should be something descriptive. For example “app_pushnotification”
- Make sure Saved to disk is checked and click Continue. Save this file as “app_pushnotification.certSigningRequest”.
Step 2: Generate the App ID and SSL Certificate
Go to https://developer.apple.com and login to your Apple Developer Account.
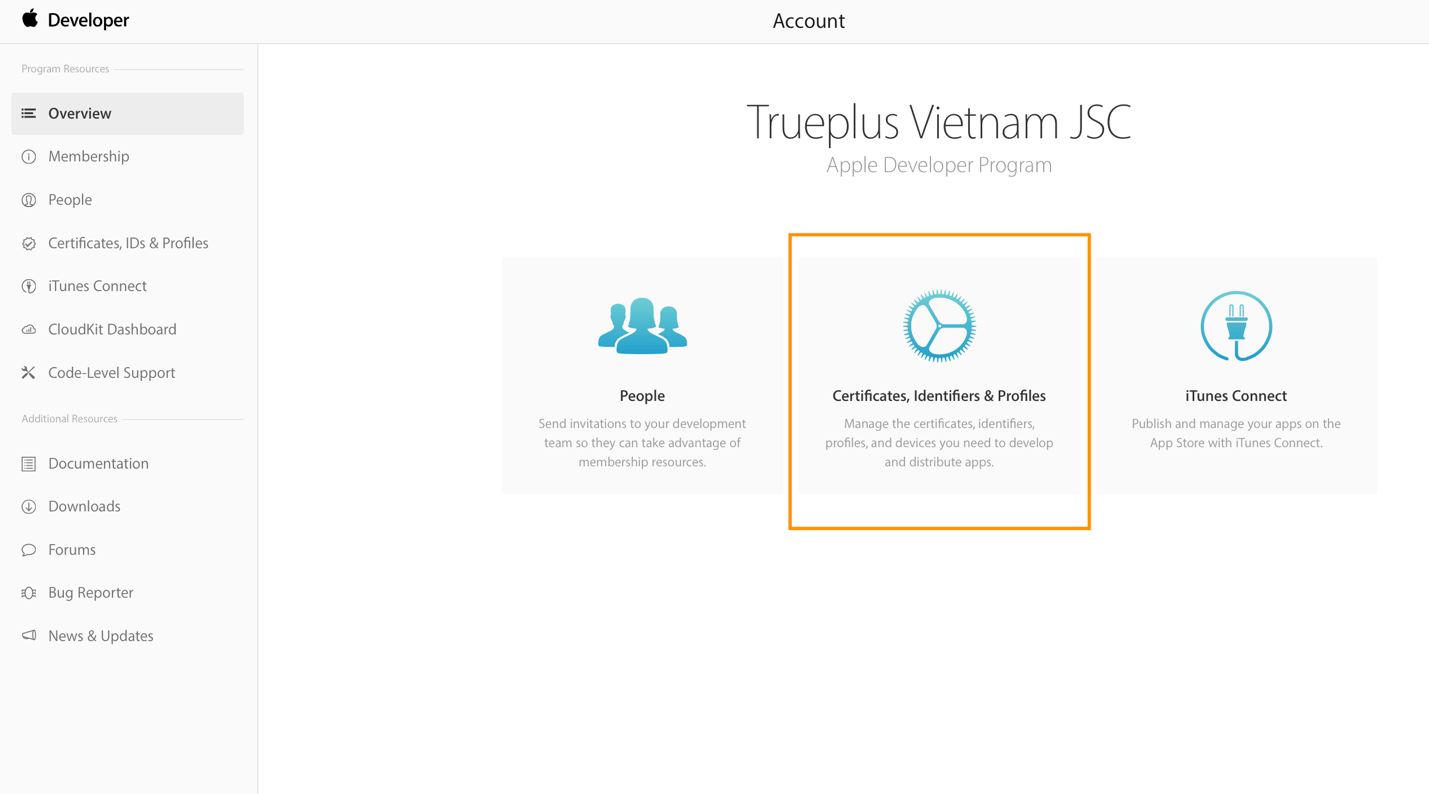
Select Certificates, Identifiers, Profiles.
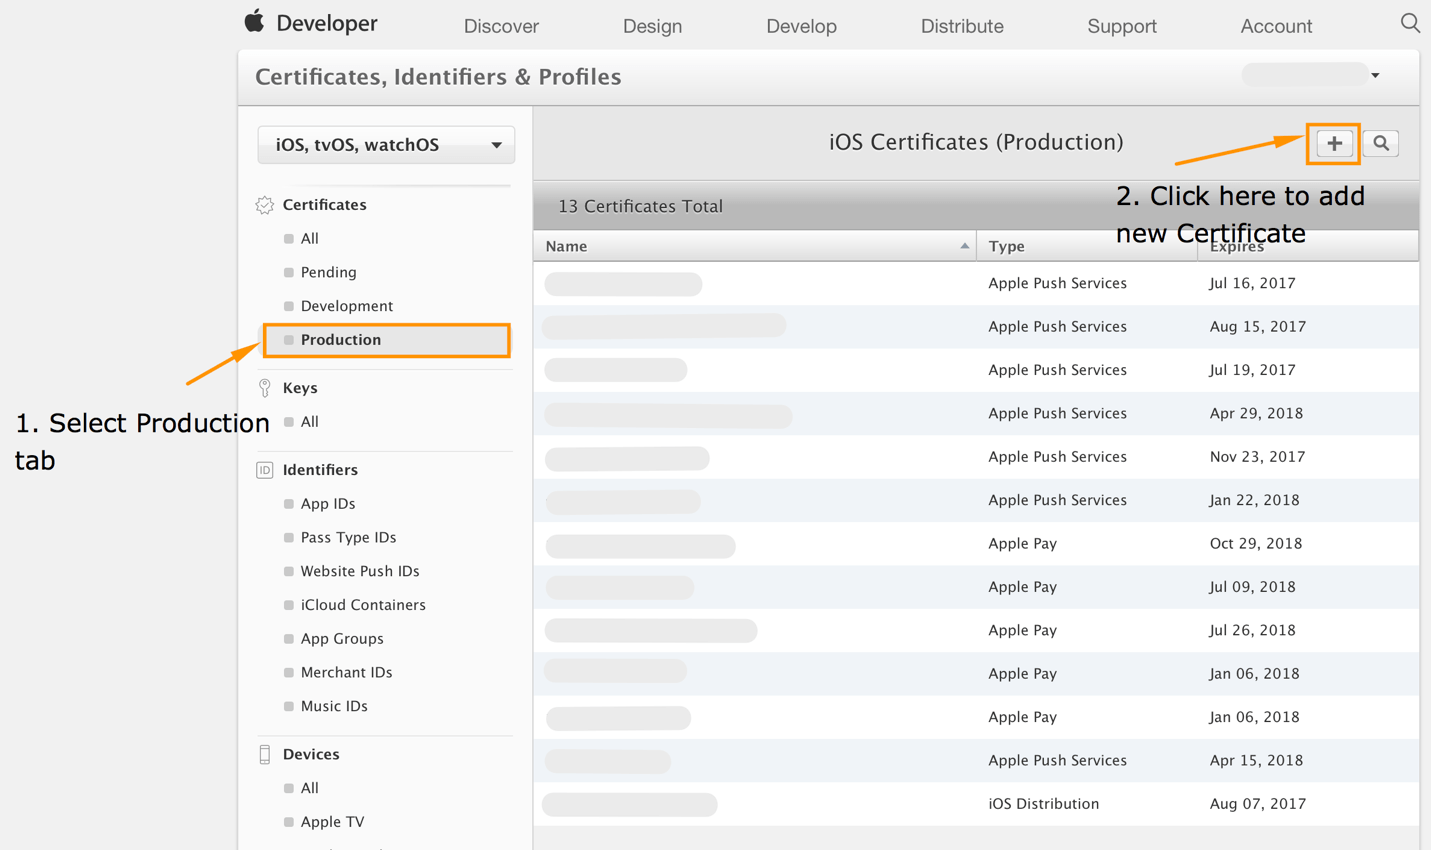
Select tab Production, then Click (+) Add to add a new Certificate.
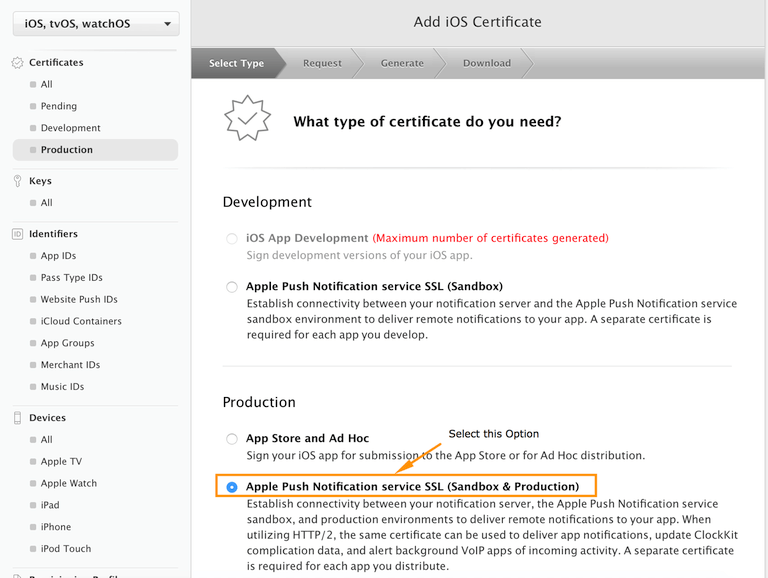
On Select Type page, select Apple Push Notification service SSL (Sanbox & Production). Then click Continue.
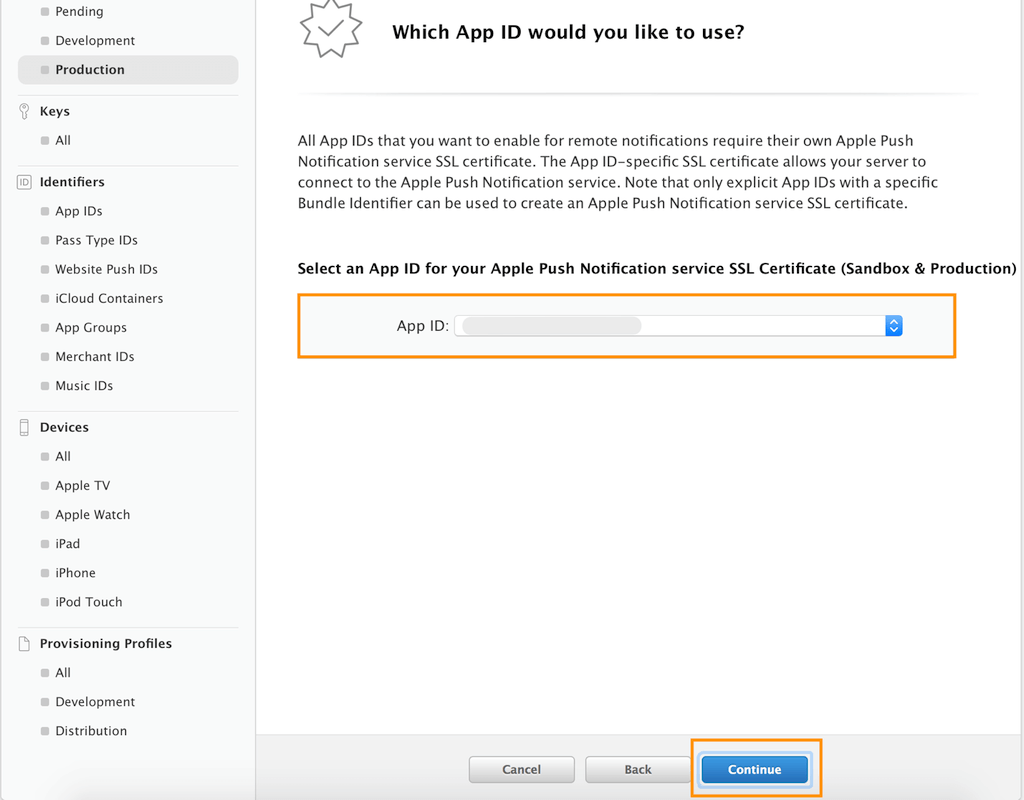
On this page, select the App ID you want to PUSH notification. Then click Continue.
Click Continue.
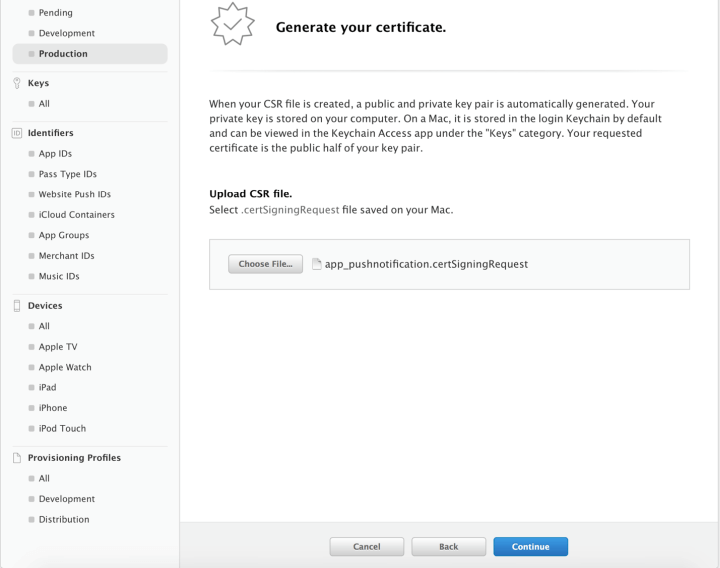
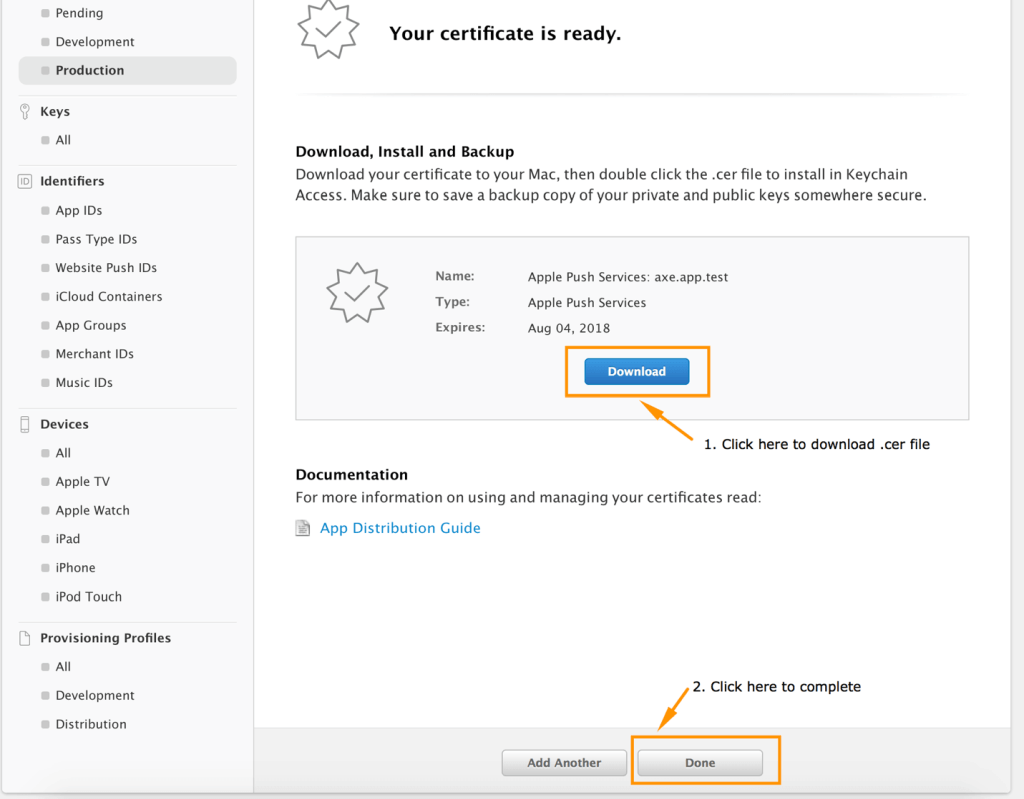
Upload the app_pushnotification.certSigningRequest file you have just created in Step 1. Then, click “Continue” and download .cer file.
Step 3. Create .p12 file
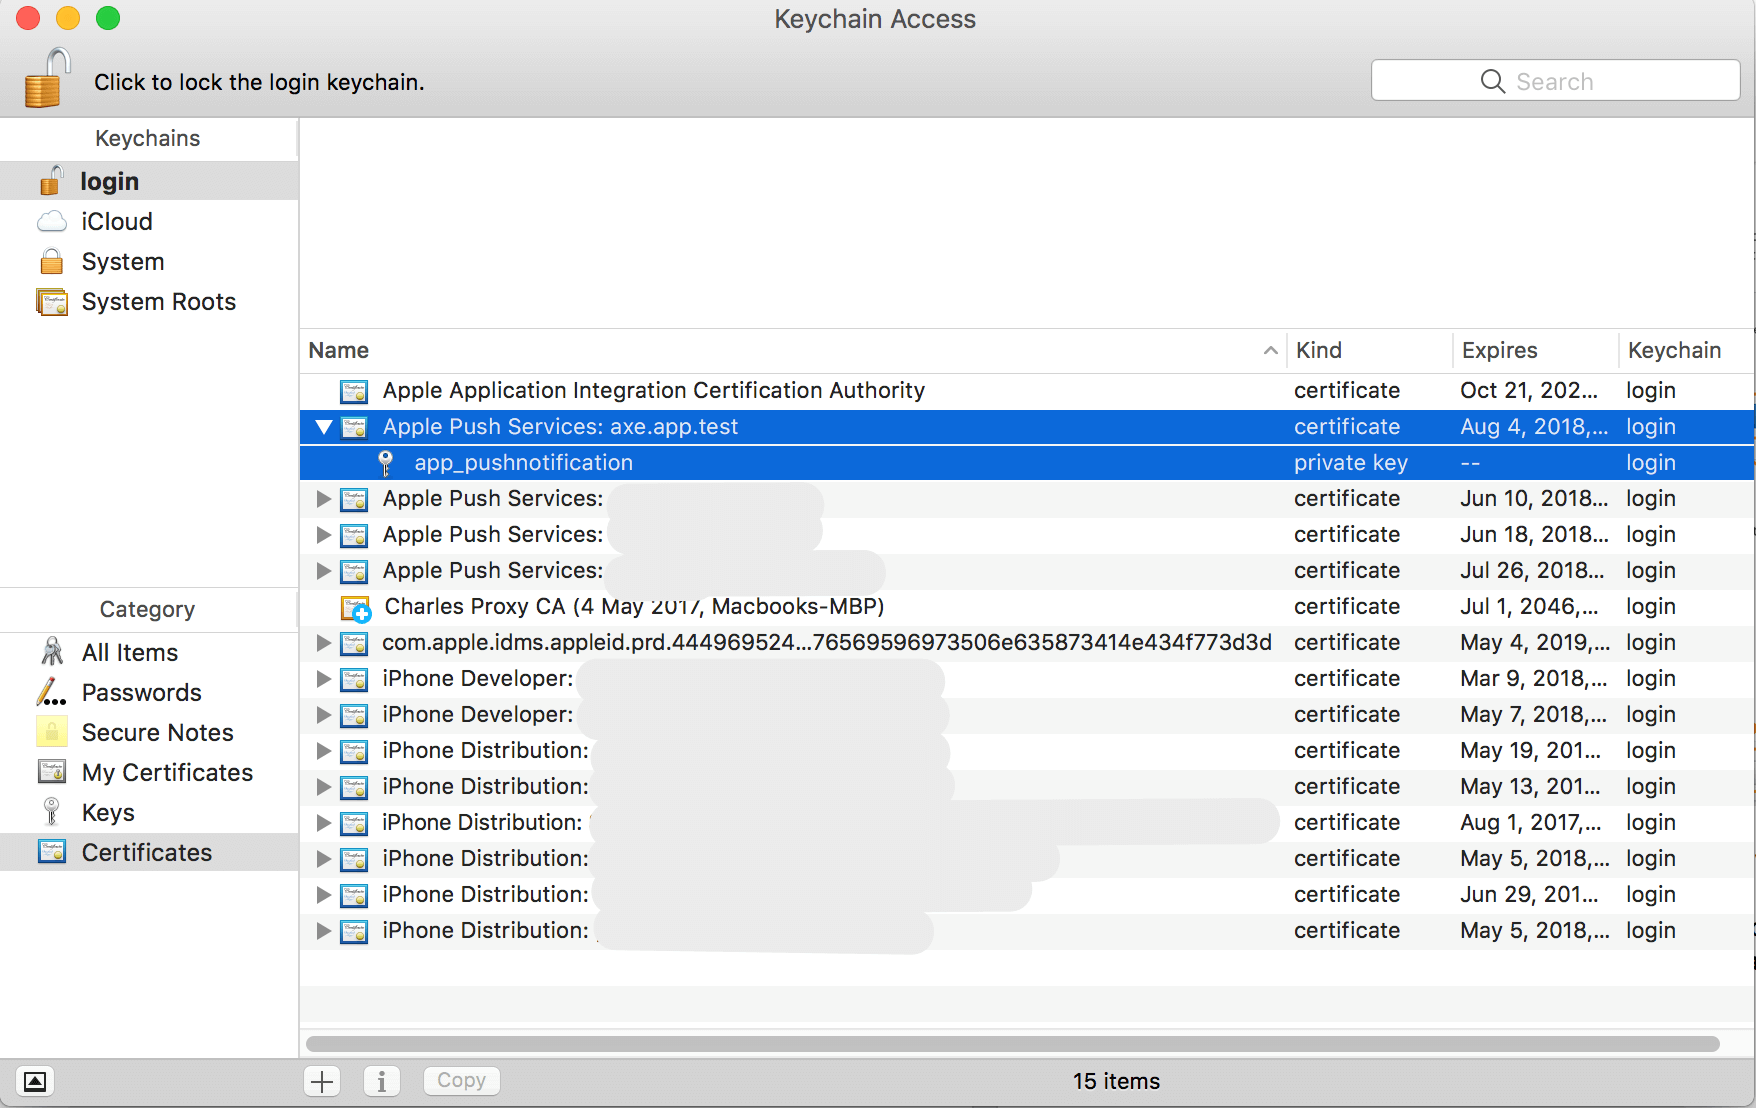
Double click on the file you have just downloaded, change file’s name to app_pushnotification.cer, move this file to your Desktop and open “Keychain Access”.
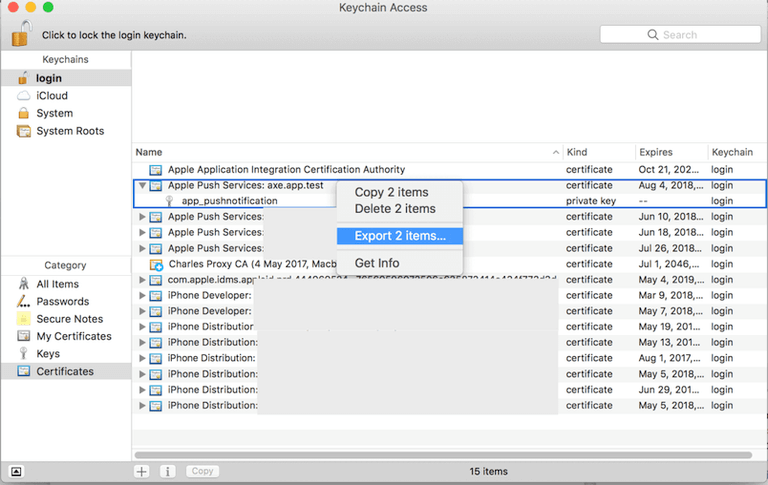
Now find “app_pushnotification” and “Apple Push Services:<your App ID>” and export these 2 items.
Name and save the .p12 file to a folder.
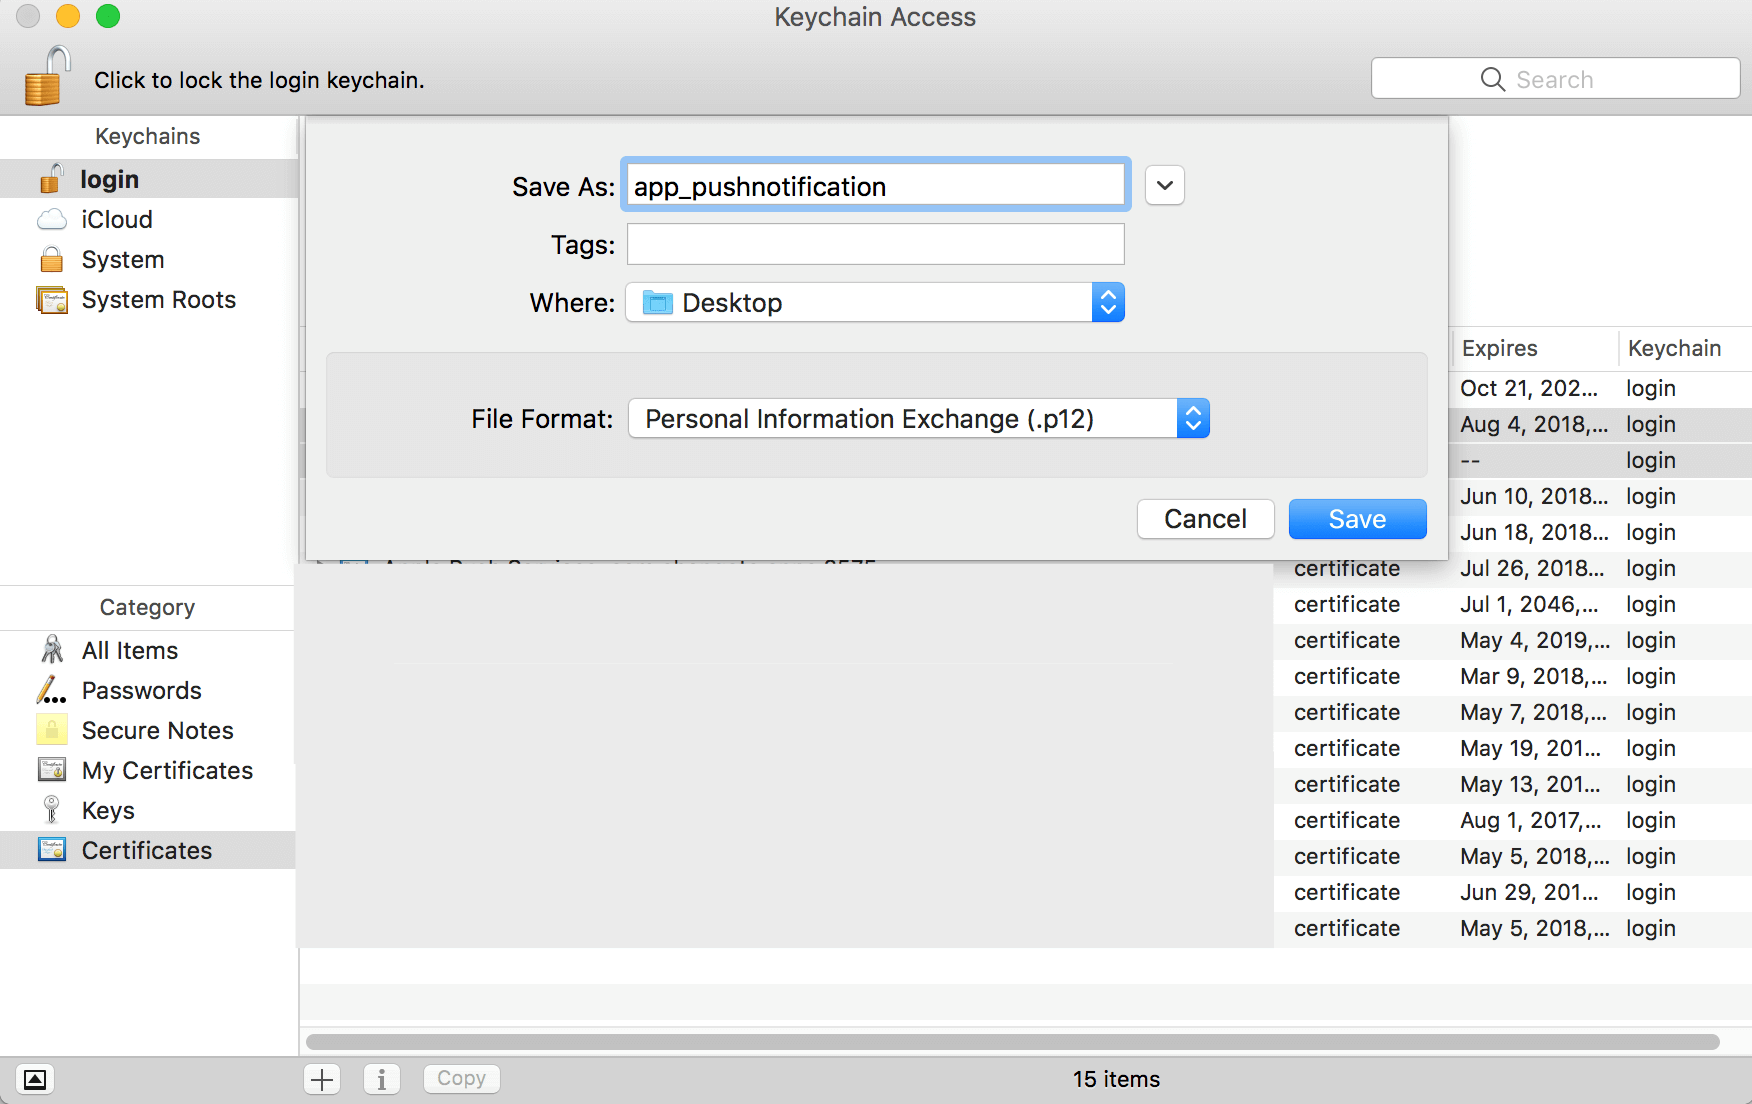
Then, there will be a popup shown asking for a password. Set your own password—make sure it is strong and unique to enhance security.
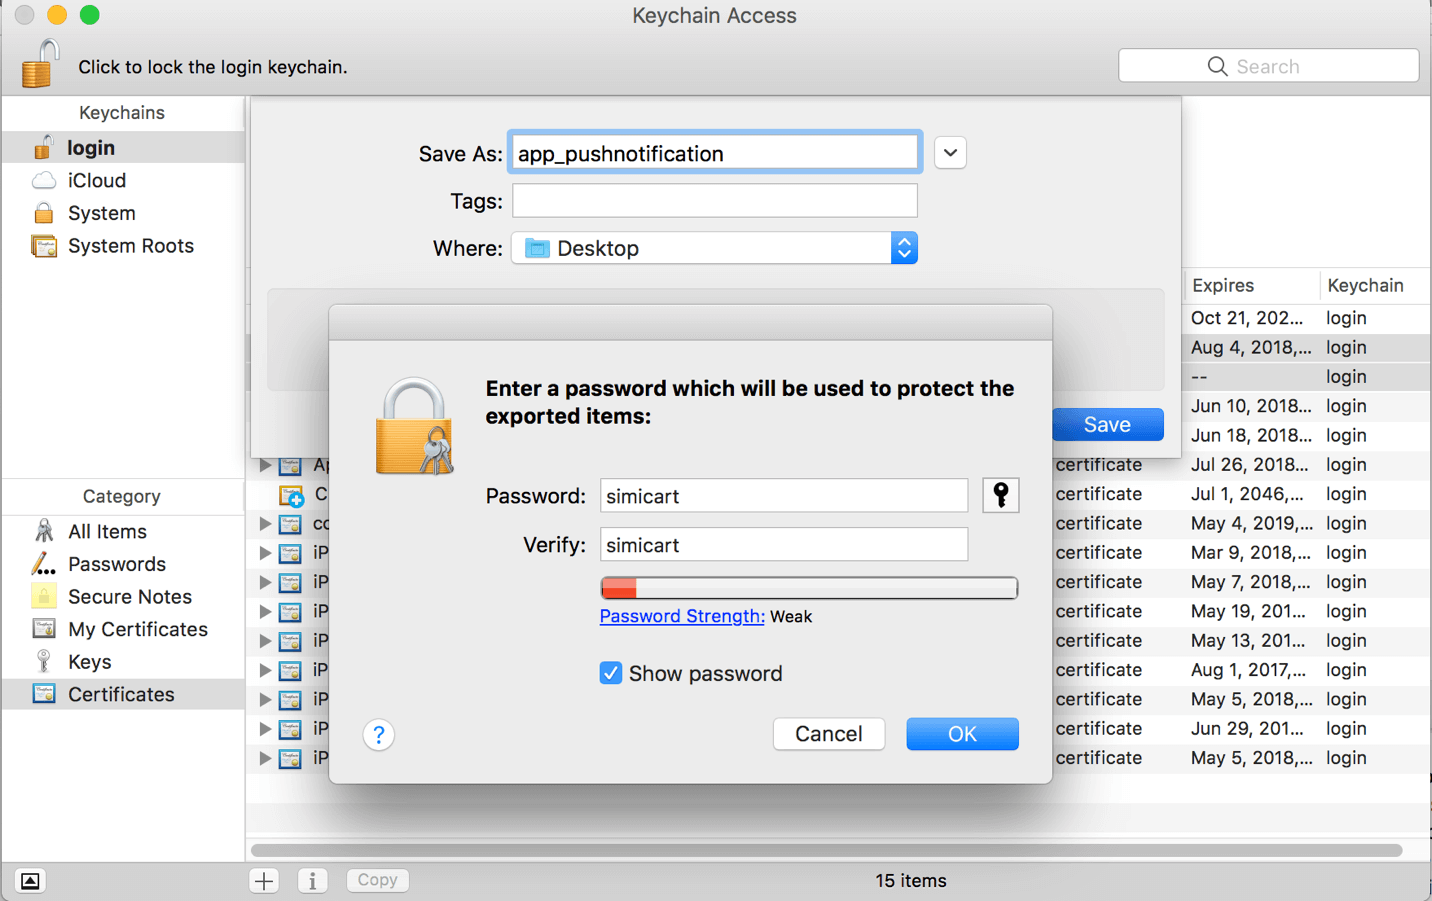
Click OK. Tada! You’ve created PushChatKey.p12 file from aps_distribution.cer file.
So now you got three files:
- The CSR
- The private key as a p12 file (app_pushnotification.p12)
- The SSL certificate, app_pushnotification.cer
Let’s move to the last step.
Step 4. Generate PEM file
Store these three files in a safe place. Then you have to convert the SSL certificate and private key into a more usable format. Because the push part of our server will be written in PHP, you will combine the certificate and the private key into a single file that uses the PEM format.
You’re going to use the command-line OpenSSL tools for this. Open a Terminal and execute the following steps.
Go to the folder where you downloaded the files, in this case is the Desktop:
$ cd ~/Desktop/
Convert the .cer file into a .pem file:
openssl x509 -in app_pushnotification.cer -inform der -out app_pushnotificationpass.pem
Convert the private key’s .p12 file into a .pem file:
openssl pkcs12 -in app_pushnotification.p12 -out app_pushnotification.pem -nodes –clcerts <Note: You need to enter the password you created at Step 10>
Finally, combine the certificate and key into a single .pem file:
cat app_pushnotificationpass.pem app_pushnotification.pem > app_pushnotification_end.pem
The file app_pushnotification_end.pem is the one you need, which can be then used to set up push notification feature on your iOS application.
Hope this helps!

